
How to Master Candidate Profiles
How to Master Candidate Profiles
Candidate profiles in 100Hires provide a complete view of each candidate's information, history, and interactions. This comprehensive guide covers essential features, expert tips, and advanced techniques to help you get the most from candidate profiles.
Opening a Candidate Profile
You can open a candidate profile from multiple locations:
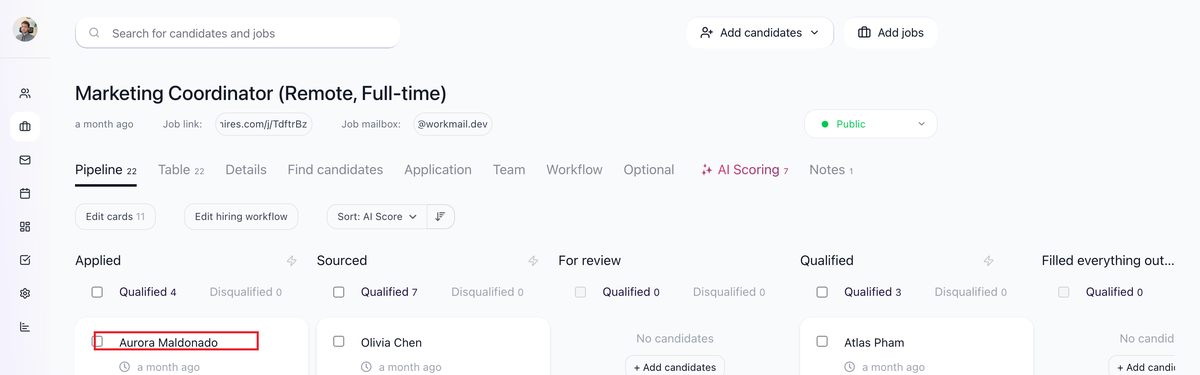
- Click the candidate's name in the job pipeline view
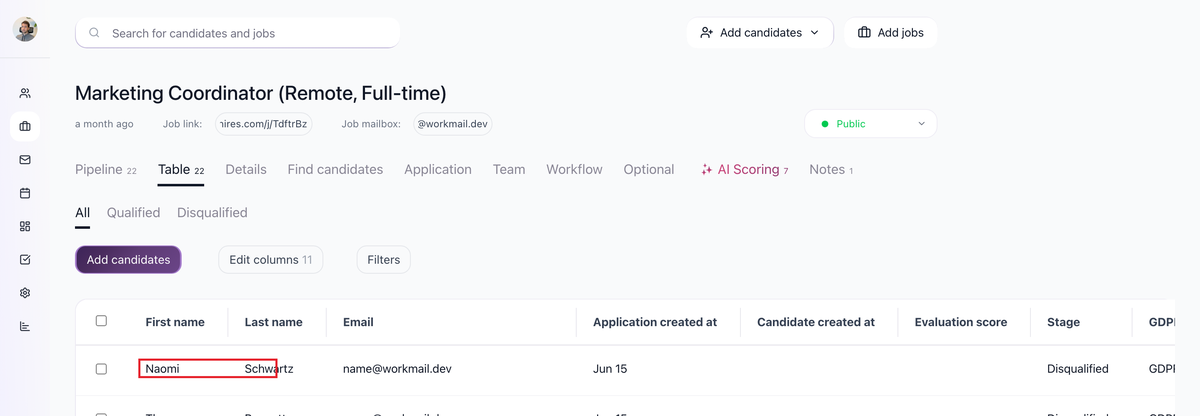
- Click the candidate's name in the table view
- Click the candidate's name from the Candidates page

- Click the candidate's name in search results

The profile opens as a modal popup with a two-panel layout. 
Profile Layout
The candidate profile uses a two-panel system with multiple tabs:
Left Panel Tabs:
- Profile
- Resume
- Forms
- Files

Right Panel Tabs:
- Discussion
- Messages
- Tasks
- Interviews
- Evaluation

You can view any combination of tabs. Click the three-dot menu to switch which tabs appear on the left or right side. For example, view the Profile tab on the right side alongside the Resume on the left. 
Profile Header Features

The profile header contains several quick actions:
- Copy name: Click the candidate's name to copy it to clipboard
- Copy profile link: Click the link icon to copy the profile URL and share with colleagues
- Google search: Click the search icon to search for the candidate's name, email, and location
- Call candidate: Click the phone icon (requires Twilio integration)
- Jobs assigned: Shows which jobs the candidate is assigned to. Click to view the full list or assign/unassign jobs
- Pipeline stage: Dropdown to change the candidate's current stage
- Qualify/Disqualify: Buttons to change candidate status. The disqualify button includes a dropdown to select the reason
- Send email: Click to compose an email using templates or create a new message
- Three-dot menu: Access additional actions like sending nurture campaigns or moving to deleted
Left Panel Tabs
Profile Tab

The Profile tab displays all candidate information:
- View and edit profile fields directly by clicking any field value
- Use "Add fields" dropdown to add additional fields for this candidate only

- Click "Manage profile fields" to open Settings > Profile Fields and configure fields for all candidates


- View candidate's location and local time (based on IP address from application form)
Important: If a candidate filled out profile fields that are not currently enabled in Settings > Profile Fields, those fields will still appear on that specific candidate's profile.
Resume Tab 
The Resume tab shows the candidate's uploaded resume:
- Preview resume with zoom controls
- Download resume using the download link
- Upload a new resume using the upload link
- Resume content is automatically transcribed and stored as a searchable field
Forms Tab 
The Forms tab displays the history of all forms filled by the candidate:
- Application form responses
- Questionnaire responses
- View responses chronologically
Files Tab 
The Files tab lets you attach additional documents to the candidate profile:
- Upload portfolios, certificates, or other documents
- Store any relevant files for this candidate
Right Panel Tabs
Discussion Tab 
The Discussion tab contains collaboration features and candidate history:
Quick Evaluation Widget:
- Rate candidates with stars (0-5 scale)
- Each rating posts to discussion notes with your name and timestamp
- Quick way to share your opinion with colleagues
- For structured feedback, use Evaluation Forms on the Evaluations tab instead
AI Scoring:
- Click "Get AI Score" button to trigger AI scoring based on the job's AI Scoring criteria
- View total score, quick summary, and per-criteria scores (0-100)
- Click "More details" for comprehensive scoring breakdown
Discussion Notes:
- Full history of all candidate actions (stage changes, disqualifications, automated actions)
- Shows creation timestamp
- Leave notes for your team
- Use @ mentions to notify colleagues (triggers email notification with link)
- Set visibility: everyone, admins only, or only yourself
Messages Tab 
The Messages tab shows all email communication:
- Displays emails from integrated mailboxes (Gmail/Outlook)
- Shows sent and received emails for this candidate (matched by email address)
- Two-way sync with your email provider
- Toggle to SMS view to see text messages
- View scheduled messages
- Edit scheduled rejection emails before they send
Tasks Tab 
The Tasks tab helps manage follow-up actions:
Create new tasks with:
- Task type (including custom types)
- Due date
- Priority (P1 to P5)
- Assignee (colleague or yourself)
- Description
Task organization:
- Three tabs: To Do, Done, Deleted
- Assignees receive email notifications
- View all your tasks on the My Tasks page
- Mark tasks as done, edit, or delete them
Interviews Tab 
The Interviews tab handles interview scheduling:
Schedule interviews with:
- Interviewers selection
- Duration, start time, and day
- Panel interview support (multiple interviewers)
- Multiple interviews for the same candidate
- Interviewer availability (if calendars are integrated)
- Interview type (customizable)
- Interview location (customizable)
- Evaluation form assignment
- Zoom integration (auto-generates meeting room)

Click "Save and Preview Invites" to see calendar invite previews before sending.
Evaluation Tab 
The Evaluation tab manages structured interviews:
- View assigned evaluation forms for this job
- Click "Assign Evaluation Forms" to add more forms
- Create forms in Settings > Evaluation Forms with custom questions
- Ensures consistent interviewing across team members
- Interviewers receive email notifications until they complete evaluations
Managing Profile Fields
Viewing and Editing Fields
Common profile fields include: First name, Last name, Email, Phone, Location, LinkedIn URL, Current company, and Current title.
To edit any field:
- Click the field value on the Profile tab
- Enter the new value
- Changes save automatically
Adding Fields
For this candidate only:
- Click "Add fields" dropdown on the Profile tab

- Select the field you want to add
- Enter the value
For all candidates:
- Click "Manage Profile fields for all candidates" on the Profile tab

- This opens Settings > Profile Fields
- Configure fields that will appear for all candidates
Tip: Avoid making fields required. This becomes inconvenient when editing profiles with empty required fields.
Customizing Field Display
You can customize which fields appear in table and pipeline views:
In table view:
- Click "Edit Columns" button

- Delete unwanted fields, add from dropdown, or reorder by dragging
- Choose from existing profile fields
In pipeline view:
- Click "Edit Cards" button

- Customize which fields appear on candidate cards
- Reorder fields by dragging the six-dot icon
To create new profile fields, go to Settings > Profile Fields.
Managing Multiple Jobs
Candidates can be assigned to multiple jobs simultaneously.
Assigning Multiple Jobs
From candidate profile:
- Look for "Assign Jobs" link near the existing job name (top left corner)
- Click to open dropdown menu

- Select multiple jobs to assign
Using bulk actions:
- Select candidates using checkboxes in table or pipeline view
- Click "Jobs"

- Choose job(s) to assign
Switching Between Jobs
If a candidate is assigned to multiple jobs:
- Click the job dropdown in the profile header

- Select a different job
- View their progress in that job's pipeline
Tags and Sources
Edit tags:
- Click "Edit tags" link to open multi-select dropdown

- Add or remove tags to organize candidates
Edit sources:
- Click "Edit sources" link to open multi-select dropdown

- Sources show where candidates came from (job board name, referral, etc.)
- View source breakdown in Reporting > Sources for specific jobs and date ranges
Keyboard shortcuts:
- Shift + T: Open Tags dropdown
- Shift + Ctrl + S: Open Sources dropdown
Disqualifying from Profile
To disqualify a candidate:
- Open the candidate profile
- Click the rejection button

- Select a disqualification reason from the dropdown (or create a new reason)

Visual indicators:
- Job name becomes crossed out
- Rejection button turns red
- Disqualification reason appears next to job name
To qualify the candidate back:
- Click the red rejection button
- Toggle off "Disqualified" in the dropdown
Important notes:
- Disqualifying stops all active nurture campaigns (confirmation modal appears)
- Default rejection email sends 3 hours after disqualification
- Rejection emails only send to candidates who applied (not manual adds, CSV imports, or resume uploads)
Sharing Profile Links
To share a candidate profile with colleagues:
- Click the profile link icon in the header
- Copy the URL

- Share the link to direct colleagues to this specific candidate
User Role Permissions
Different user roles have different access levels to candidate profiles:
Capability | Administrator | Recruiter | Interviewer |
|---|---|---|---|
See all candidates | Yes | Only for assigned jobs | Only for assigned jobs |
See messages tab | Yes | Yes | No |
Full profile access | Yes | Yes | Limited |
Access issues:
If you cannot see candidates:
- Check if you're on the correct company account
- Verify you have sufficient permissions
- Ask an admin to add you to the hiring team for specific jobs OR make you an administrator
Updated on: 07/08/2026
Thank you!